
Overview
If you have ProxMox for a hypervisor, then you are used to creating Virtual Machines by allocating a new machine, attaching the installation media of an operating systems, and then manually installing that operating system. The whole process might take :10 or :15 minutes.
![]()
But wait, when I use a cloud provider like Digital Ocean, how can they provision a new VM with my settings in about a minute? That is what a “cloud image” is. In ProxMox it’s called “cloud init”
How Cloud Images work in ProxMox
The concept is basically that:
- Download: You download a purpose-build “cloud image” to start from. These are an image of a hard drive with a super-minimal OS already installed, but with with hooks available to modify key things like: hostname, creating a non-root account, etc.
- Create a ProxMox VM: ideally programmatically, and attach this hard drive image. Then, finish configuring whichever default settings you want.
- Configure the VM: with defaults you’d want for each machine (if you want). For example a default username/password, SSH
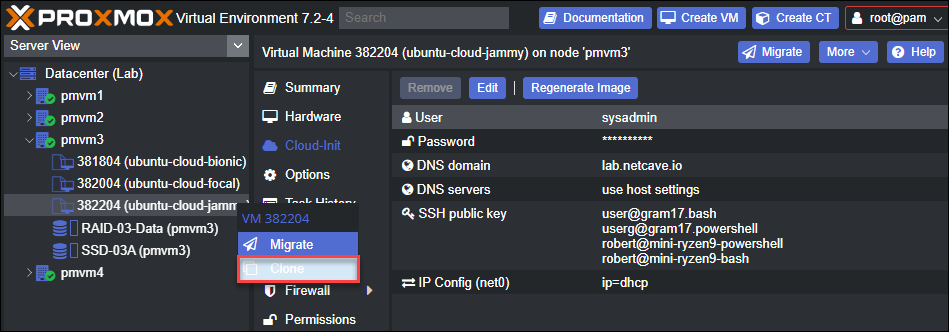
authorized_keys, whether to use DHCP or static IP, DNS servers, and a DNS suffix lookup. - Convert VM to a ProxMox template: Now, it’s no longer a “regular” VM. It’s a template that you can right-click on and choose “clone”.
In the end, you’ll see some templated (note the slightly different icons) in ProxMox where you can right-click and choose “Clone”:


On my modest hardware, from clicking “Clone” above, this took:
- :12 Seconds to provision the VM. I then click start.
- :21 Seconds to get to a login prompt.
The thinking being that instead of creating a new VM from scratch, and manually installing the OS each time, you can very quickly spin up a new VM, just like they do it in the cloud providers, by using this technique.
Assuming you are sold on the concept, the good news is that this is pretty straight-forward. In fact, it’s so relatively easy that you could even make a script that does this for each version of Ubuntu. When a new version come out, you can run the script again to support cloud images for that latest version.
LaunchPad - an optional prerequisite
Ideally you want to log into your VM’s (at least in a homelab environment) with a preset of SSH keys. See Using Launchpad for SSH Keys for how to store and reference your workstation / client SSH public keys so that you can easily add them to the authorized_keys of your newly-created machines.
Steps (by hand)
Below are the steps on how to build-out an Ubuntu cloud image on your ProxMox installation.
STEP 1: Download
Log into the ProxMox server and from that remote command-line, get the cloud images from:
with a command like this, to version version 22.04 (Jammy Jellyfish):
1
wget https://cloud-images.ubuntu.com/jammy/current/jammy-server-cloudimg-amd64.img
STEP 2: Create a VM
From the same command-line, create a virtual machine with a ProxMox VMID of 8000, with 2GB of RAM, and named ubuntu-cloud with a default network interface:
1
qm create 8000 --memory 2048 --name ubuntu-cloud --net0 virtio,bridge=vmbr0
Import the disk into the proxmox storage, into SSD-04A in this case.
1
qm importdisk 8000 ./jammy-server-cloudimg-amd64.img SSD-04A
Add the new, imported disk to the VM (by VMID 8000):
1
qm set 8000 --scsihw virtio-scsi-pci --scsi0 SSD-04A:8000/vm-8000-disk-0.raw
Add a CD-ROM:
1
qm set 8000 --ide2 SSD-04A:cloudinit
Specify the boot disk:
1
qm set 8000 --boot c --bootdisk scsi0
Add support for VNC and a serial console:
1
qm set 8000 --serial0 socket --vga serial0
At this point you should see a VM in the ProxMox console but DO NOT start it.
Pro Tip: One of the nuances of any cloud image is that they wait until first boot to create their unique, randomly-generated system ID. If you boot this VM now, and then make clones of it later, those clones will all appear the same to DHCP and other systems that rely on this uniqueness.
STEP 3: Configure the Template
In the web UI, navigate into the template you are building and into the Cloud-Init tab. Set whatever defaults you want.
Warning: The “IP Config” will default to static with NO IP address. So either set an IP address or set to DHCP.
Also on the Hardware tab, consider setting the defaults for CPU, Memory, and Disk.
STEP 4: Convert to Template
Right-click on the VM and choose “Convert to Template”.
STEP 5: Clone to Create VM
Right-click on the VM (note the new icon), and choose Clone to create a new VM based on this template.
Steps (for automation)
Below are some options for making this more automated and predictable.
Option 1: As a one-off run
To do this via the command-line as one-step, copy the following into a text editor, change what you need and then past into a shell prompt for a ProxMox server:
1
2
3
4
5
6
7
8
9
10
11
12
13
14
15
16
17
18
19
20
21
22
23
24
25
26
27
28
29
30
31
32
33
34
35
36
37
38
39
40
41
42
43
44
45
46
47
48
49
50
51
52

VM_ID="41000"
UBUNTU_DISTRO="focal"
MEM_SIZE="2048"
CORES="4"
DISK_SIZE="120G"
STORAGE_NAME="SSD-04A"
CI_USERNAME="sysadmin"
CI_PASSWORD="P4zzw0rd123!"
LAUNCHPAD_ID="johndoe"
SEARCH_DOMAIN="localdomain"
SSH_KEYS="./keys"

echo "[*] Download SSH keys from Launchpad"
wget https://launchpad.net/~${LAUNCHPAD_ID}/+sshkeys -O ./keys
# See: https://www.techbythenerd.com/posts/using-launchpad-for-ssh-keys/

echo "[*] Download the Ubuntu 'cloud image'"
wget https://cloud-images.ubuntu.com/${UBUNTU_DISTRO}/current/${UBUNTU_DISTRO}-server-cloudimg-amd64.img

echo "[*] From the same command-line, create a virtual machine:"
qm create ${VM_ID} --memory ${MEM_SIZE} --name ubuntu-cloud-${UBUNTU_DISTRO} --net0 virtio,bridge=vmbr0

echo "[*] Import the disk into the proxmox storage, into '${STORAGE_NAME}' in this case."
qm importdisk ${VM_ID} ./${UBUNTU_DISTRO}-server-cloudimg-amd64.img ${STORAGE_NAME}

echo "[*] Add the new, imported disk to the VM:"
rm ${STORAGE_NAME}:${VM_ID}/vm-${VM_ID}-disk-0.raw

qm set ${VM_ID} --scsihw virtio-scsi-pci --scsi0 ${STORAGE_NAME}:${VM_ID}/vm-${VM_ID}-disk-0.raw

echo "[*] Add a CD-ROM:"
qm set ${VM_ID} --ide2 ${STORAGE_NAME}:cloudinit

echo "[*] Specify the boot disk:"
qm set ${VM_ID} --boot c --bootdisk scsi0

echo "[*] Add support for VNC and a serial console:"
qm set ${VM_ID} --serial0 socket --vga serial0

echo "[*] Set other template variables"
qm set ${VM_ID} --ciuser ${CI_USERNAME} --cipassword ${CI_PASSWORD} --cores ${CORES} --searchdomain ${SEARCH_DOMAIN} --sshkeys ${SSH_KEYS} --description "Virtual machine based on the Ubuntu '${UBUNTU_DISTRO}' Cloud image." --ipconfig0 ip=dhcp --onboot 1 --ostype l26 --agent 1

echo "[*] Resize boot disk to ${DISK_SIZE}B"
qm resize ${VM_ID} scsi0 ${DISK_SIZE}

echo "[*] Convert VM to a template"
qm template ${VM_ID}

rm ./keys
echo "[+] Done."
Option 2: A proper script
I actually spent some time on creating a proper script for this. This includes (but is not limited to):
- Downloading the cloud image, but also downloading the SHA256 sums (like we’re supposed to) and verifying the hash. This will retry upto 3 times if there is a problem.
- The script is idempotent (you can run it again and again and it knows what to do). If that VM template already exists, it deletes it first. If the Ubuntu image already exists but is corrupt, doesn’t exist, etc - the downloader handles that.
Anyhow, it’s all baked into one script here:
https://github.com/TechByTheNerd/ubuntu-cloud-image-for-proxmox
The main README covers all of the details. In essense though, this is what you need to run this script:
1
sudo ./prox-cloud-template-add.sh [id] [storage] [distro] [user] [password] [searchdomain] [launchpadid]
or as an example:
1
sudo ./prox-cloud-template-add.sh 4000 SSD-01A focal sysadmin G00dPazz22 intranet.example.com jdoe
Resources
This was mostly gathered from Techno Tim and specifically, this video:
viewed here:
And also from the ProxMox documentation: